Rethinking how we talk about offensive space in horizontal stack.
October 2, 2019 by Joseph Marmerstein in Analysis, Opinion with 0 comments
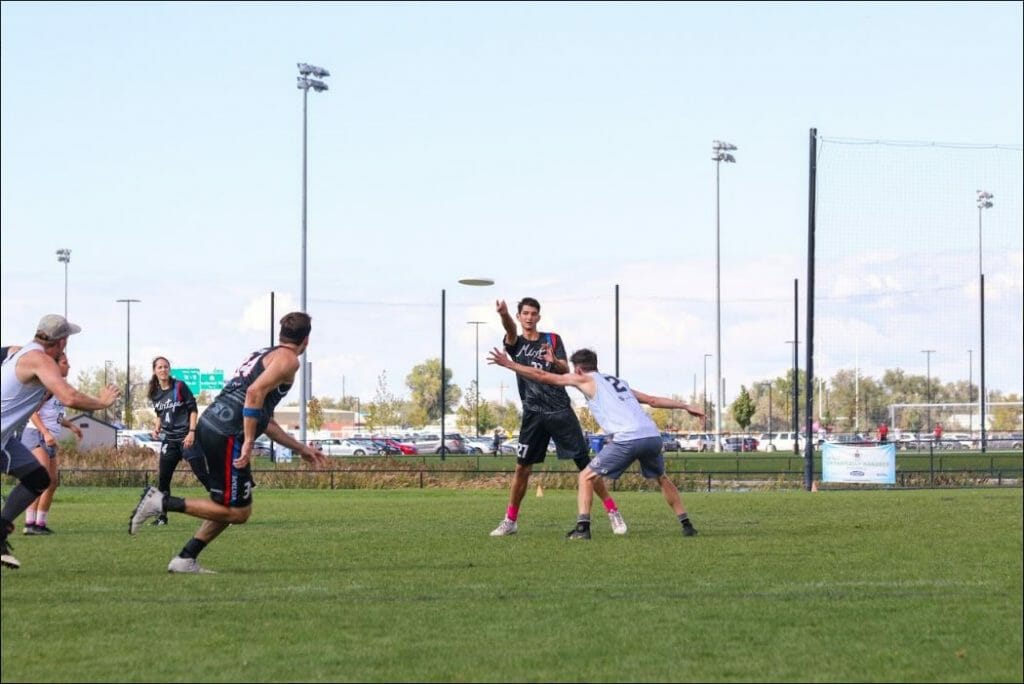
The goal of this article is to present an offensive framework for running horizontal (ho) stack, and to improve ho stack understanding and teaching by analyzing the spacing and dynamic movements rather than the static positions of players. There are many ways to teach and to run ho stack, but in my experience, many teams — especially young college teams — simplify it in a way that either hurts their offensive potential or is an inaccurate representation of how they actually run the offense. Common techniques include teaching ho stack as “cutting in lanes,” “pistoning with a partner,” or “middle cutters initiating.”
I believe the approach outlined in this article allows for a more dynamic offense that can better take advantage of disc and player movement. While this article focuses solely on ho stack, several of the core concepts are crucial to many parts of ultimate and easily translate to various offenses and defensive positioning in person or junk defenses.
Understanding Strong and Weak Space
The core concept to understand is the idea of strong and weak space. Many teams teach the field as being divided into a force-side and a break-side, which is an accurate, but incomplete picture of how the field is laid out. Alex Davis, in his presentation on shutdown defense, helps visualize space in terms of heat maps. Strong and weak space is a slight simplification of those concepts.
Strong space is the area of the field that the thrower can easily/immediately attack with a relatively simple throw. Weak space is space that can be hit with a throw, but the throw is higher difficulty, will take longer to get there, or may be more easily poached.
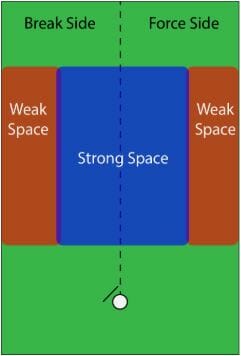
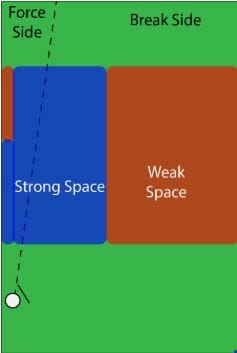
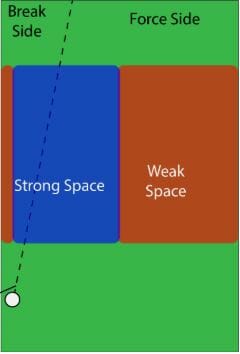
Several visualizations of strong and weak space are shown below, based only on the position of the disc and the mark. Note that these are approximations: the actual shape and size of the strong space will be variable, but hopefully this can give you some idea of the concept.
In this first example, the disc is in the middle with a forehand force. The blue space represents the strong space – throws to this area get there quickly and can be thrown relatively easily. Notice that the break side is still part of the strong space. Similarly, the far force sideline of the field is weak space, since those throws take longer and gives an easier angle to the defense to close any separation.
In this second example, the disc is on the trap sideline, with a backhand force. Here, the far breakside of the field is all weak space – those throws have to get past the mark, over other defenders that may be in the way, and will take longer to arrive. Directly in front of the disc is strong space, though deeper on the force side is weak space, as it’s a tight window to hit with an away shot when the sideline acts as an additional defender.
The final example shown here is with the disc on the break sideline. The strong space does not shift much – and the weak space is still on the far side of the field, since the angle and flight time still makes throws to that side more difficult.
Spacing Concepts For In Cuts
For in cuts in the ho stack, we want to attack into strong space from weak space. In order to accomplish this, we have two primary goals: (1) clearing the strong space, and (2) players in the weak space ready to set up cuts. If you are in the strong space and not currently making a cut to get the disc, you need to be clearing out of the strong space and into a weak space. Common horizontal stack initiation plays also rely on these principles, such as the “diamond” or “drag” plays, which clear cutters out of strong space and have a cutter slashing from weak to strong. This will allow one of your teammates to attack the strong space, and also set you up for secondary/continuation cuts.
As the disc moves up/across the field, the strong and weak spaces change. In ho stack, we want in cuts that are more “slashing” — angles are good. This is why we want our cuts originating from the weak space. We generally do not want to be making/throwing to cuts that are directly away or directly towards the thrower. The “diamond” cutting pattern, perhaps the most common play run out of horizontal stack, is a great example of this motion of attacking strong space by slashing through the space at angles.
To be as effective as possible, cutters need to see disc and player movement happening and be ready to clear and attack the strong space as it shifts. If you are currently in the strong space or what is about to be the strong space (based on other cuts, movement of the disc, etc.), you should either be currently making a cut to get the disc, or, more likely, clearing out of the strong space and into a weak space, with your head up to receive a possible pass as your clear. If you are in a weak space and have good spacing, attack into the strong space with an aggressive, decisive cut.
As you and your team get better at this movement, the next step is to anticipate the movement of the disc to see where the strong space will be a second or two from now. If you are in what will soon become the strong space, start your clearing cut; if you are in what will be the weak space, start preparing to make an attacking cut.
If you watch many high level offenses, you will notice these concepts at play. I’ve chosen one game which has a lot of horizontal stack played and plenty of examples: an exhibition game between Team Canada and Team USA from 2016. Below are a couple examples showcasing cutters clearing out of strong space as the disc moves, and other cutters setting up cuts from the weak space.
Spacing Concepts For Deep Cuts
The next core offensive principle to discuss is how to make deep/away cuts in a ho stack. One advantage of a horizontal stack is that it generally keeps cutters closer to the disc, opening a larger area of space behind the stack for deep/away cuts. Thus there are many positions and angles to make effective away cuts in a ho stack. We will focus on the two most common methods because they generally create the largest throwing windows and are more difficult to defend.
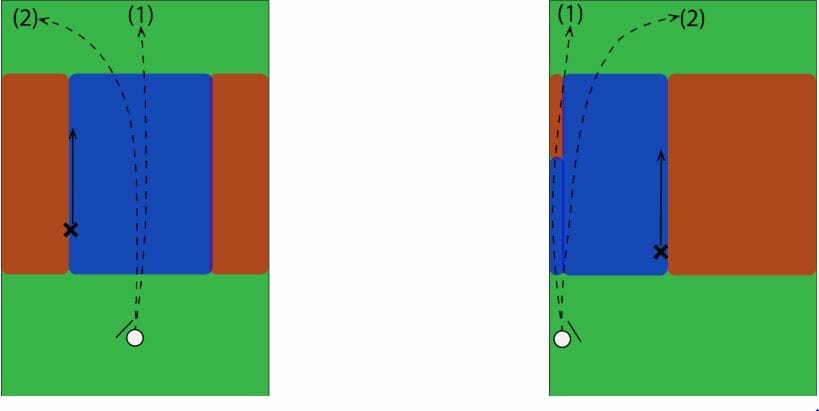
The first method , which I refer to as ‘thrower-led’ is the most common: cutting away in a line that is (close to) parallel to the sideline, close to the border of strong-weak space. This allows the thrower to read the defense and put a throw that will give the receiver the best chance to catch the pass. For example, the thrower could put a flat throw in front of the receiver; or they could put a throw with more edge on it and fade it to the weak space (this type of throw is commonly called a “breakside fade”).
Often people like to talk about “different thirds” when talking about optimal huck spacing, but this doesn’t capture the whole picture; throwing a huck to a cutter on the opposite third of the field can actually be very difficult – smart defenders will be playing towards the middle of the field, which will make them closer to the disc when you release it, sometimes allowing them to get better position to defend a huck. So, rather than just simplifying the huck lanes into thirds, we want to think of our thrower-led huck cuts as being near the edge of strong and weak spaces, while the throw travels through the strong space and can end at various points on the field. This allows us to get optimal spacing, avoiding throws directly over the cutter’s head, while also keeping cutters close enough to the thrower to have better angles to get position on their defender.
In both images above, the cut parallel to the sideline gives the thrower multiple options, including a breakside fading throw (shown in image on the right).
This is a great example of a thrower-led away pass – I’ve written more about what makes this particular cut so effective. Notice how the cut parallel to the sideline gives the thrower the option to throw the forehand (which the mark stops) and also the IO backhand into the same space.
This is another strong example of a thrower-led away pass. Notice how the thrower puts a slight OI edge on the throw, which gives the cutter the option of either attacking the disc as high as he can (as shown here), or sealing out the defender and letting the disc fade to the break side.
In this example, the handler catches a strike cut, and the cutter uses the power position to start a deep cut. He cuts parallel to the sideline and stays close to the weak space. This time, the thrower puts a little OI edge, which carries the disc towards the breakside. The cutter can seal out his defender and easily make the catch.
The slight angle to this cut leaves open the forehand down the right sideline (as well as the possibility of an S-cut to a backhand, which I’ll describe in a minute), which is what happens here. This clip has an added bonus of showing a cutter clearing out of strong space immediately as the disc changes position on the field.
The second method for deep cuts in a horizontal stack, which I refer to as ‘cutter-led’, is commonly called an “S-cut”. In this case, the cutter initiates by aggressively attacking towards strong space, rather than cutting parallel to the sideline. A cutter will attack the strong space at an angle, then plant and cut back towards the weak space. While these throws can be more difficult, if there is enough space (e.g. a fast break scenario), they can be deadly.
This image shows the three primary options in a cutter-led S-cut scenario. Option 1 is an immediate throw up the sideline – if this throw doesn’t go, the cutter can plant and cut back across the field (the “S” in S-cut). The thrower can then choose to throw an inside, shown as option 2, or an around, shown as option 3. Hammers, blades, or other over-the-top throws can also be used to lead the cutter back towards the weak space. These types of cuts can be used in any offense, but the lack of a “stack” of defenders in the middle of the field makes it even more threatening in horizontal or spread offenses.
Both of these types of cuts can be very useful under different circumstances. Generally, parallel deep cuts are more common as they make the throwing window much bigger, give the thrower more options throughout the cut, and transition easily into great in cuts.
Spacing Concepts For Handler Positioning
The final piece needed to construct our horizontal offense is the positioning and movement of our handlers. Strong and weak space generally refers to the downfield cutters, but handler spacing is also very important to giving throwers options to attack the space with multiple throwing options. This could be a separate series of articles on its own, so I won’t go too in-depth here. The setup and movement of your handler set will likely depend on your personnel and what things you value in your offense, but I’ll list a few possibilities here.
If you have strong static throwers (throwers who can break the mark and throw hucks well against a set mark), you may want to have your resets setting up slightly behind the line of the disc. This will create a larger strong space because the handler guard poaches are moved further from the throwing lanes. However, this will make it more likely that you will lose yards on your resets, and may make your resets more difficult.
If your team values getting easier resets and not losing yards, you might have your resets set up even with the disc, or even slightly upfield. You may want your cutters/handlers to be fluid, with handlers clearing downfield and cutters filling back in; other teams may want certain handlers to always be near the disc, and have a more regimented cutter/handler divide. These are discussions your team leadership should have, and figure out what sort of reset system you want to use to maximize your strengths.
The figures below, while slightly exaggerated, show an example of how moving your resets slightly behind the disc can open up a larger strong space upfield. However, it often forces you to lose yards on resets, and may make it harder for your resets to get open consistently.
For Subscribers: How To Practice Using Strong and Weak Space
For Ultiworld subscribers, I’m going to explain a few drills coaches and players can use to enhance their understanding and execution of these concepts.
Bonus Content for Understanding Strong & Weak Space in Horizontal Stack is only available to Ultiworld Subscribers
Already have a subscription? Log in
Whether you visit Ultiworld for our reporting, our podcasts, or our video coverage, you can help us continue to provide high quality content with a subscription. By becoming a subscriber, not only do you receive benefits like bonus content and full article RSS feeds, you also help fund all of Ultiworld's coverage in general. We appreciate your support!
