|
|
DAVIDE’S DOCTRINES: HORIZONTAL STACK |
|
|---|
FEATURED ATHLETES: CUSB Shout & CUSB La Fotta
Hi! My name is Davide Morri. After 23 years in the ultimate world, I’ve realized how difficult it is to find articles and books that connect high-level technical and tactical issues to their implementation on the field. In this column, I will try to provide some concepts, coaching techniques, and drills to improve your routine practice. I hope this work will be useful to your training and a good read for all!
THE HORIZONTAL STACK CAN BE USED to initiate various set plays to get disc flow started. Its horizontal (sideline to sideline) structure has the significant advantage of favoring vertical (end zone to end zone) spaces for disc movement, and in particular, clear overhead lines toward the end zone. This layout also opens up room for receiving in the under space toward the handlers.
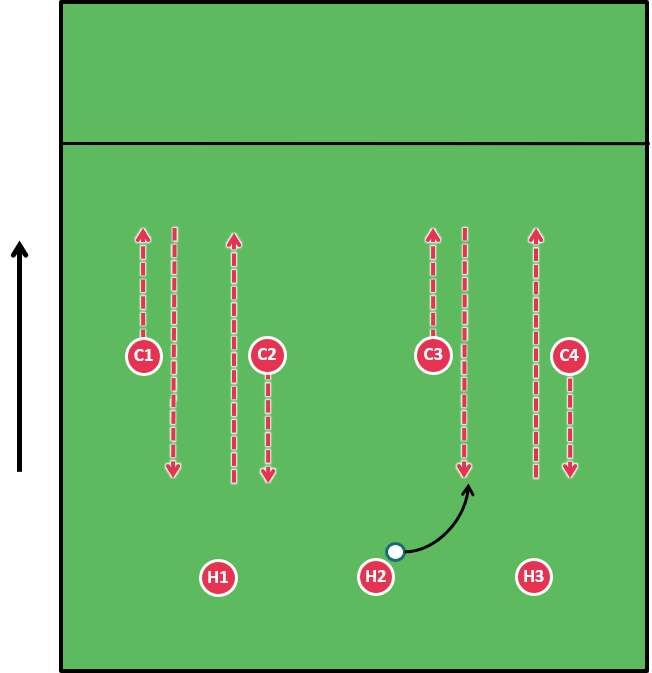
We will analyze the horizontal stack formation with three handlers and four cutters so that we can have the same layout for the various set plays we are going to look at. We will first discuss the spacing structure of the horizontal stack, and then go through three set plays. Finally, we will give some drills that can help your team improve their horizontal stack.
|
|
BASICS: STRUCTURE & SPACING |
|
|---|
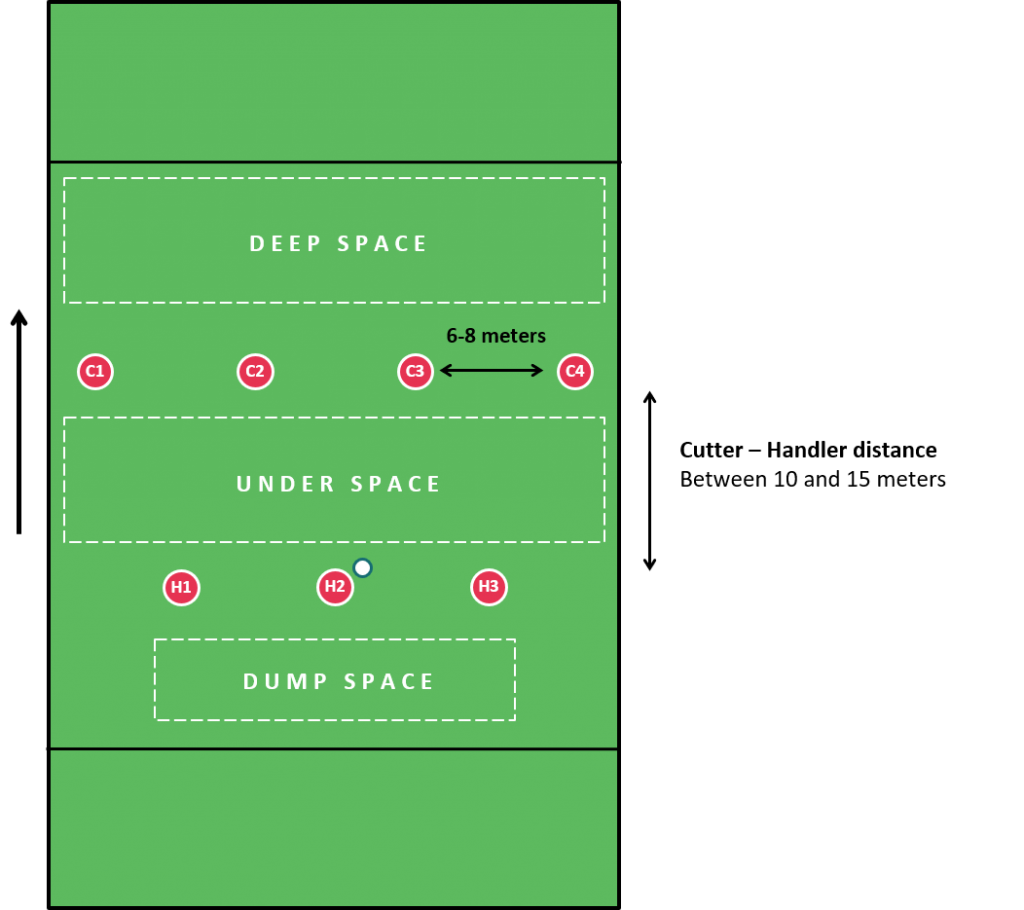
The horizontal stack layout gives the cutter two options, to cut to the under space (toward the handlers) or to the deep space (toward the end zone). Cutters can cut to or clear from these areas to create throwing options that favor disc flow.
Handlers and cutters must be between 10 and 15 meters apart. This distance is important. If the cutters set up too far away from the handlers, the handlers may not be able to complete passes to the deep space. On the other hand, if the cutters are too close to the handlers, the under space risks collapsing into the space for handler movement.
|
|
APPLICATIONS: PLAYS & SYSTEMS |
|
|---|
 |
 |
 |
|---|---|---|
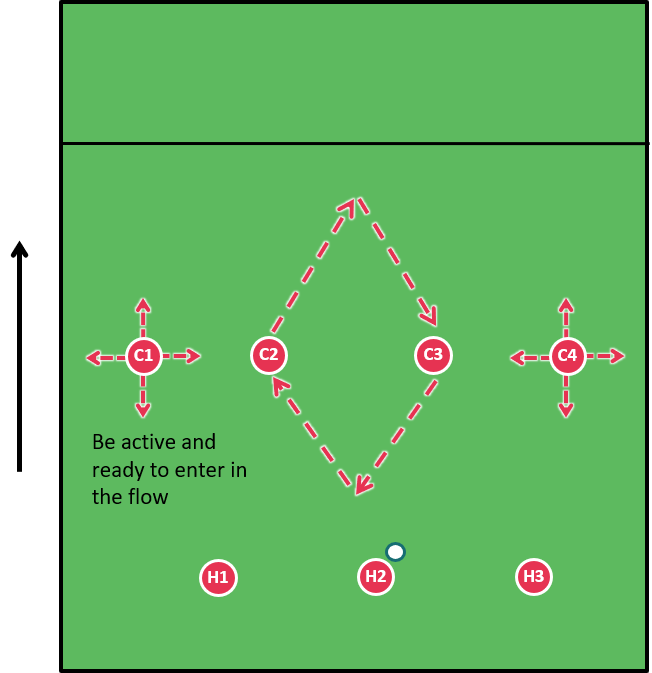
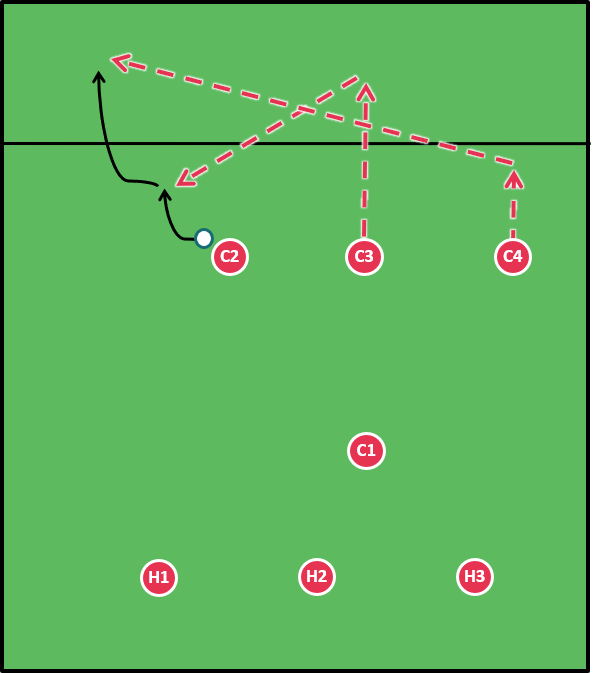
STEP 1 Central cutters make complementary “diamond” cuts. Side cutters stay active and engaged. |
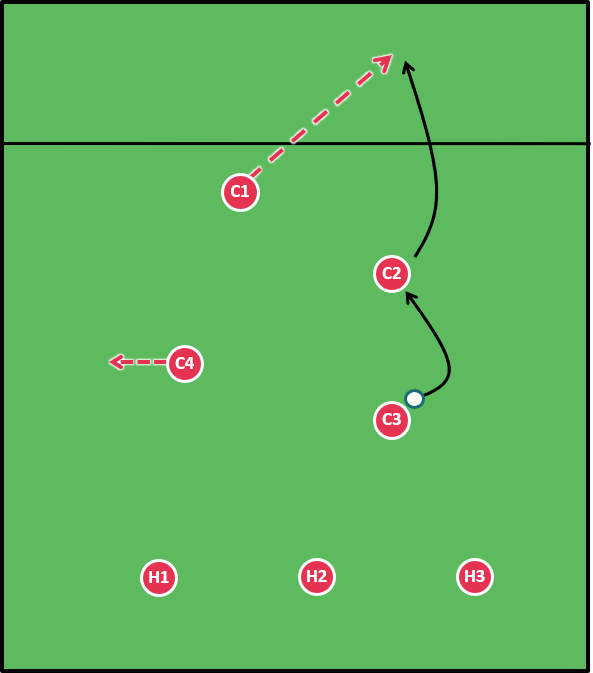
STEP 2 Pass to one central cutter completed. Other central cutter cuts for next pass as side cutter cuts for continuation pass to end zone. |
STEP 3 Play completed in the end zone. |
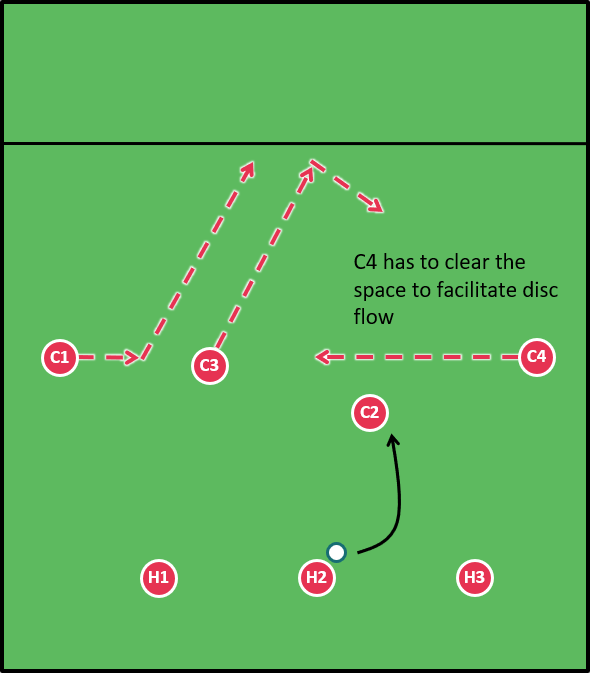
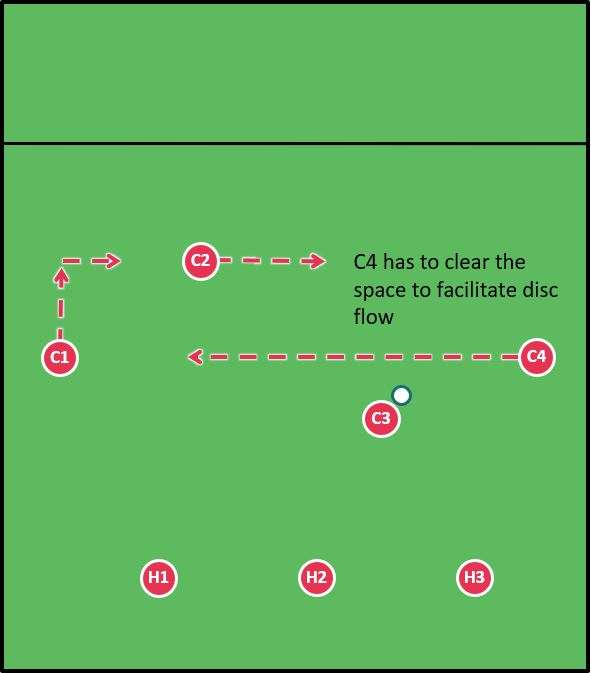
The diamond set play begins with movement from the central cutters (C2 and C3), who cut along diamond-shaped lines to create passing options in both the under space and the deep space.
It is important for C2 and C3 to always look at the disc while cutting, as they need to be ready to receive any passes, or possibly adapt their movements depending on how disc flow evolves.
The cutters in position C1 and C4 along the sidelines help ensure the success of the diamond play by the primary, mid-field cutters. C1 and C4 must keep moving, sliding, and faking small cuts near their designated position to constantly annoy and distract their defenders. This perpetual movement will put their defenders on alert, preventing the defense from setting up moves like poaches and switches.
By staying active, these cutters will be ready to either enter the game flow following the primary central cutters or clear the space if they are not involved in the next stages of disc flow.
- Every cut and crossover must be done with maximum intensity so that the defense will see the cutters as dangerous.
- It is important to continue clearing out and repositioning during the development of the set play, especially if game flow becomes more dynamic. Active clearing and repositioning create possibilities for passage sequences that lead to the end zone.
- The best way to learn this kind of set play is to practice the play’s choreography: first with two cutters, then three, then four. Once the movements for every position have been assimilated, you can start in-game simulations with defense in place, whether from mid-field or from the pull.
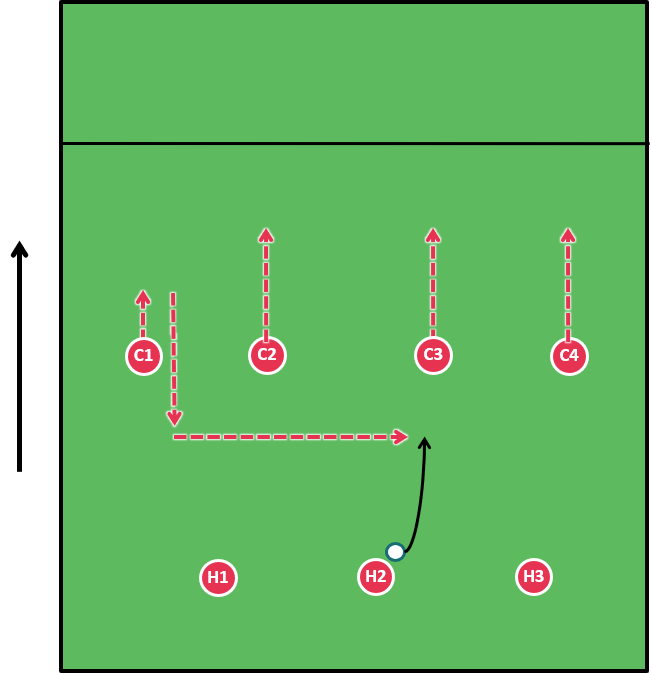
- Remind the players how important it is to keep the disc in the center of the field and to avoid getting stuck on the sidelines. Moreover, it is the handlers’ job to guarantee that the first throw, which initiates play, be toward mid-field.
 |
 |
 |
 |
 |
|---|---|---|---|---|
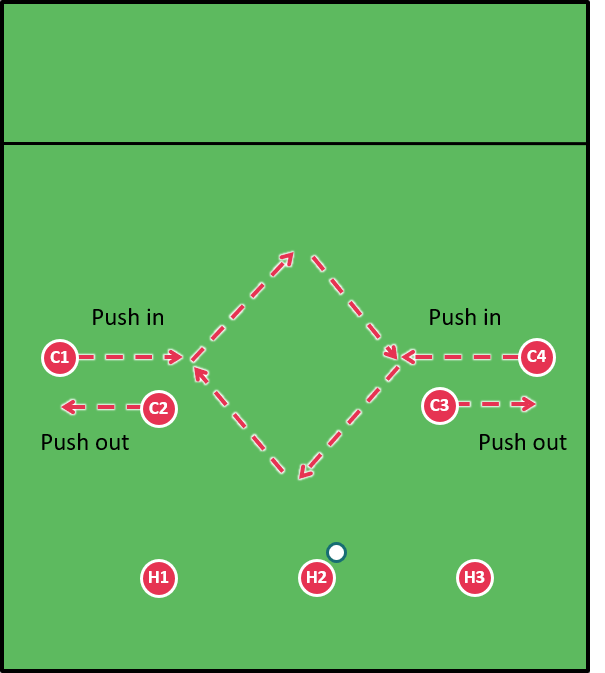
STEP 1 Central cutters make complementary “diamond” cuts. Side cutters stay active and engaged. |
STEP 2 If central cutters don’t receive a pass, side cutters push in to take their place on the field. |
STEP 3 New central and side cutters repeat step 1. Cycle can repeat until a pass is complete. |
STEP 4 Pass to one central cutter completed. Other central cutter cuts for next pass as side cutter cuts for continuation pass to end zone. |
STEP 5 Play completed in the end zone. |
Another version of the diamond set play involves a push system. In this system, the central cutters (C2 and C3) change places with the sideline cutters (C1 and C4) without obstructing options for vertical flow between the handlers. In this system, the central cutters ask the lateral ones for relief when they are getting tired and have not succeeded at receiving the disc.
- The difference between a system and a set play is that a system can be renewed repeatedly as players cycle through the play’s main moves. The basic diamond set play cannot be repeated after the first few moves, especially when the defense relies on poach or junk defense. On the other hand, the diamond push system can be repeated again and again until the play takes shape.
- In the diamond push system, disc movement by the handlers is essential. They have to maintain possession at the center of the field and wait for a downfield throwing opportunity to open up in the under space or in the deep space.
- After disc flow begins, the movement sequences of the diamond set play, seen above, can be used to finalize the point.
 |
 |
 |
|---|---|---|
STEP 1 Cutters make vertical cuts back and forth. Each moves in the opposite direction of the cutter beside them and in sync with the cutter on their neighbor’s other side. |
STEP 2 When a pass is completed, the receiver’s partner (who was moving in the same direction) sprints to the end zone, while the other cutters provide more downfield options. |
STEP 3 If a pass to the partner cutter in the end zone is not immediately available, the play can be completed with an assist from another cutter. |
Another set play that can be used to initiate a point is the double piston play. This set play has some advantages: because the cutters move along vertical lines, it is more intuitive and easier to learn than the diamond plays since the cuts are made vertically.
The cutters are divided into two pairs, the “pistons” (C1 and C3, C2 and C4). The two pairs move in opposite directions — one pair cuts deep as the other pair cuts under — in straight vertical lines, as if they were on train tracks.
To set up proper timing for the piston pairs’ cuts, have the central cutters (C2 and C3) move in opposite directions at the beginning of the play. The movements that follow depend on which of the two couples receives the disc.
In this set play, the piston pairs go back and forth a few times until one gets possession of the disc. Next, that cutter’s partner (who was moving in the same direction) sprints toward the end zone, and the receiver immediately looks at a throw to the deep space. The other piston pair (who were moving in the opposite direction) supplies two options for throws to the under space. The cutter in possession of the disc can either throw deep to their partner or to one of the cutters in the under space.
- This set play has the advantage of being more aggressive for offensive moves in the under and deep space. Furthermore, any time the handlers move the disc from the center of the field toward a sideline or vice versa, there are opportunities for throws to the end zone, regardless of the position.
- On the other hand, all the cutters move simultaneously; this requires a lot of energy, which could exhaust the cutters if disc reception is not accomplished early on.
- In this play, too, players should keep their eye on the disc as they make their sprints and cuts, ready to receive at any time.
- Practice this play first with two cutters positioned in the center of the field. Later, add side cutters. Be sure to stress the importance of clearing space. Players who have not received the disc can get in the way and impede disc flow.
 |
 |
 |
|---|---|---|
STEP 1 A side cutter cuts horizontally across the field as the other cutters clear vertically toward the end zone. |
STEP 2 The initiating cutter receives the disc and advances it to one of the other cutters. |
STEP 3 The play is completed in the end zone. |
The last horizontal stack set play, the sweep cut, demands a horizontal cut by the primary cutter (C1). The vertical movements by C2, C3, and C4 will open up space for C1’s reception of the disc.
The strategic choice to have C1 start their cut laterally forces the defender to take a defensive position that is disadvantageous, since they can contain disc reception, but not stop it. The cutter in the C1 position will have to learn how to crossover at maximum speed. This forces the defender to rotate at the hips and momentarily lose balance; in turn, this makes it more difficult for the defender to chase C1.
After C1 catches the disc, cutters C2, C3, and C4 must come back to occupy the under space, creating three options for the continuation. Among these three options, continuation to C2 is ideal because it moves the disc to the other side of the field without interrupting disc flow. The option to throw to C3 or C4, however, should also be considered, since those options would allow the game flow to develop in the deep space.
- Practice this play first with a pair of cutters of one half of the field (C1 and C2 or C3 and C4), then bring in the remaining cutters.
- Cutters who are not involved in the first cut must clear on a vertical line simultaneously. Their timing is crucial and must be kept in mind.
- The first pass from the handlers is of fundamental importance. If the handler manages to place the disc in the area C1 is cutting toward, a major advantage is obtained, as C1 can now position the next throw so that its recipient has multiple throw options to complete the play.
|
|
TEACHING: DRILLS |
|
|---|
In the following diagrams, you will find two preparatory exercises for the horizontal stack to use in your team practice.
The exercises described below are designed to be indefinitely repeatable, with all the players on the field involved. We suggest you set a time limit or a maximum number of passes.
These horizontal stack plays require a lot of continuous movement from the cutters, which can tire cutters out. This drill works on maintaining cutting and throwing form despite fatigue from continuous running.
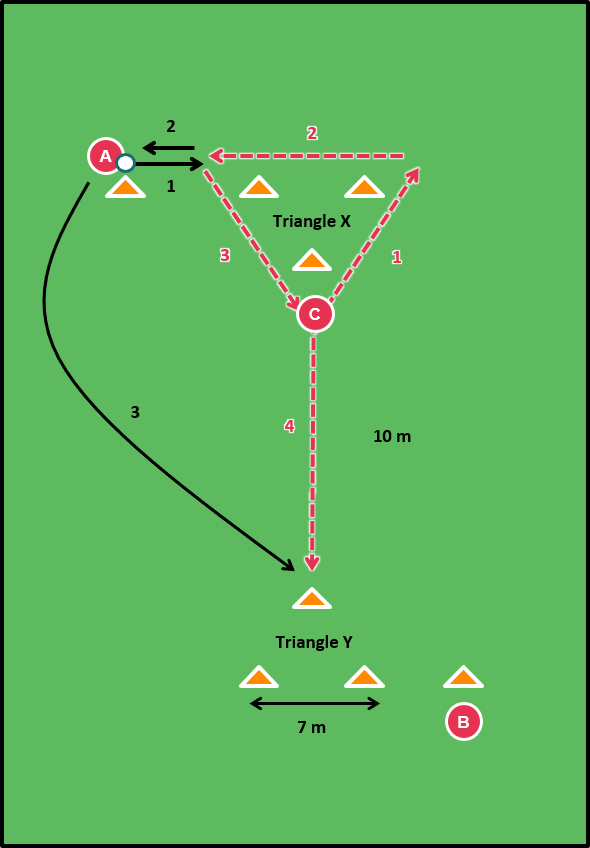
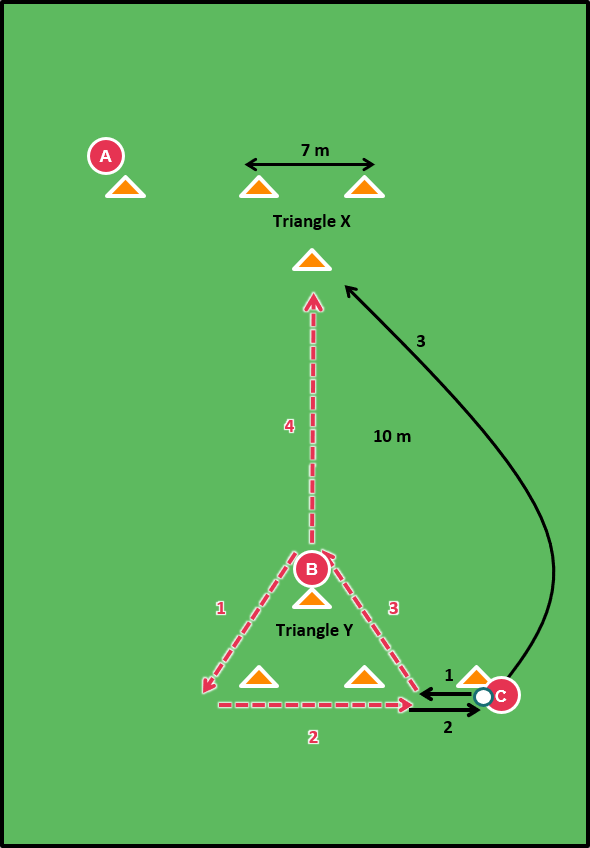
- Active Player C runs Triangle X along paths 1 and 2.
- Player C completes a short-range give-and-go pass sequence with Player A between paths 2 and 3.
- Player C completes Triangle X along path 2 and cuts vertically toward Triangle Y.
- Player A throws to Player C, who completes the pass at the front cone of Triangle Y. After catching the disc, Player C jogs the disc to the throwing position of Triangle Y.
- As Player C jogs the disc to the throwing position of Triangle Y, Player B jogs to the front of Triangle Y and completes this sequence in the other direction, with Player C in the handler role previously fulfilled by Player A.
The purpose of this drill is to run through the cutting patterns of the different set plays described above. Each drill ends with a huck from the initiation cutter to the continuation cutter.
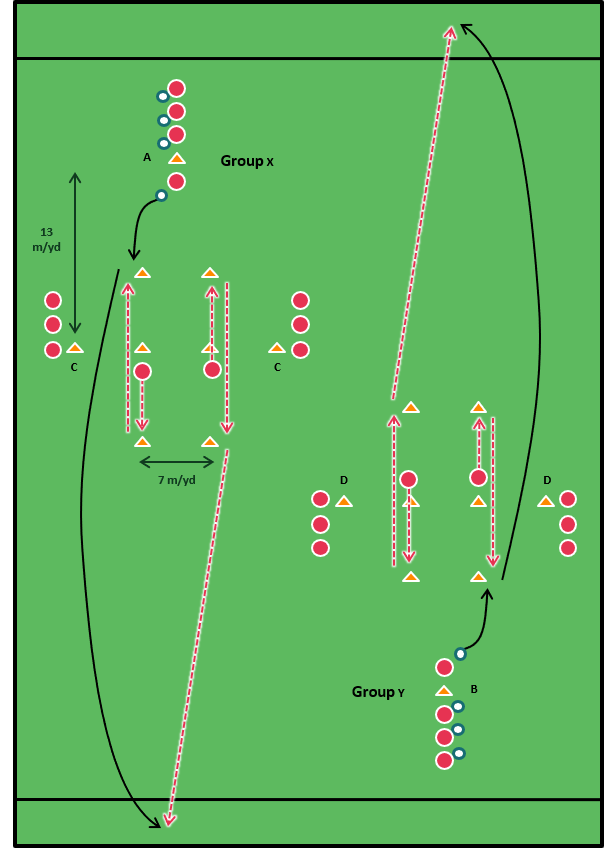
- Two groups of players set up on the field as shown, in a modified horizontal stack formation with one active handler and two active central cutters per turn. Cones may be placed on the field to help guide cutters’ movements.
- The two active cutters choose to run a diamond, double piston, or sweep cut play. (The double piston play is shown above as an example.)
- The drill ends with a pass to the end zone. If the pass is complete, the cutter can change groups. If the pass is incomplete, the cutter returns to the cutters’ line in their own group.
Davide Morri
More Features

How to Throw a Backhand in Ultimate Frisbee
Learning the basics of throwing is one of the first tasks on every new player’s to-do list -- and even 20-year veterans still strive to improve their throwing.

The Illustrious Partnership of Megan Praz and Meghan Kemp-Gee
The duo behind the long-running Contested Strip comic talk ultimate culture, creative process, and their forthcoming graphic novel One More Year.

The Ulti-Matic College Championships Recap Generator
Infinite natties content!

Project-Manage Your Tournament To Success
With this adaptable planning spreadsheet and phase-by-phase guide, you too can manage a small- to medium-sized weekend event with flair!