Kyle Weisbrod breaks down the mechanics of a huge range of throwers to identify best practices for the forehand.
July 9, 2015 by Kyle Weisbrod in Analysis
The final part of the four-part series on the forehand discusses best practices based on video analysis.
Over the past several months, I’ve been shooting video of throwers at all levels from novice middle and high school players to top-level club players throwing forehands. Using the video, I’ve been identifying common mechanics that the best throwers share and that developing throwers do not. There are a number of aspects of forehand mechanics where there is a correlation between technique and execution, many of which are absent from most forehand resources I’ve come across.
Off-Elbow Drive
Many years ago, Michael Baccarini, the head coach for Paideia HS, recognized that many of his best forehand throwers were initiating their forehand throwing motion by lifting up their off-arm to chest level and then driving it to the outside of the body. He termed this motion opening the curtain to cue this technique in developing throwers.
In the video I’ve shot, most advanced throwers consistently exhibit a good off-elbow drive. I believe this motion activates the trapezius and other back muscles behind the off-shoulder; these muscles provide an anticipatory counterbalance to the forward motion of the throwing side of the body. This is consistent with studies on movement that have found that anticipatory postural movement (which we are unaware of in the moment) precedes what we think of as voluntary movement.
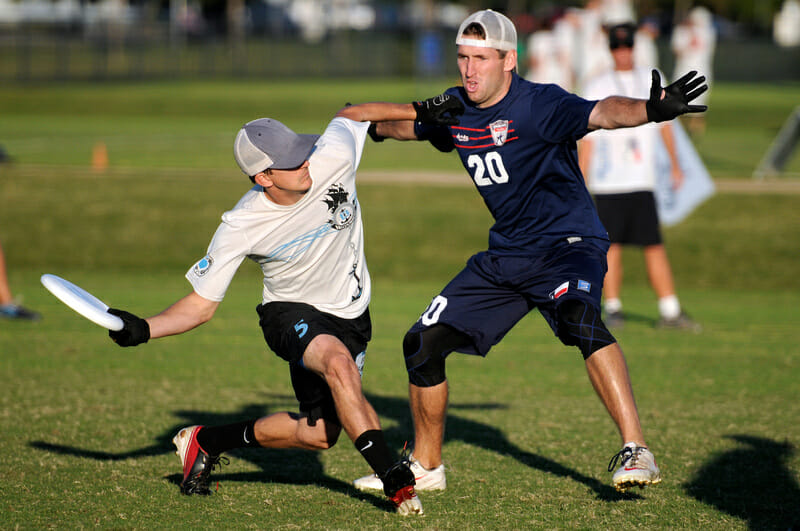
The majority of forehand resources put sole attention on what is happening on the throwing side of the body. But a cue for the off-side of your body could be the most important one of all. And once you become aware of this important piece of the mechanics, it is hard to miss it. Almost every picture of an experienced forehand thrower shows them counterbalancing with their off-arm at every point in their throwing motion.

New throwers often have their off arm as a trailing part of the mechanics, a whole appendage that is just along for the ride. Fury recently published a great side-by-side of Lakshmi Narayan throwing forehands and the difference in her off arm is very clear between her formative years and now. While both of these pictures are prior to Narayan initiating her throw, in the more recent picture her off arm is up and prepared to drive.

Intermediate throwers often engage their off-arm, but are not using it to their fullest—either driving at angles that don’t maximize power, driving too lightly, or having a non-fluid motion from driving too early or too late.
The best off-elbow drives seem to involve the following components:
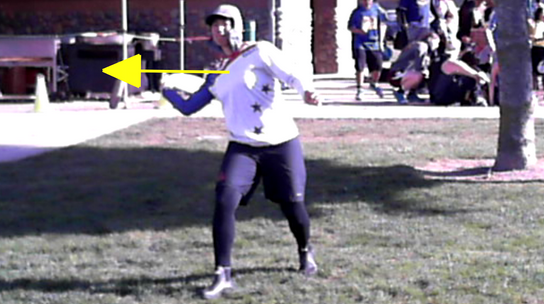
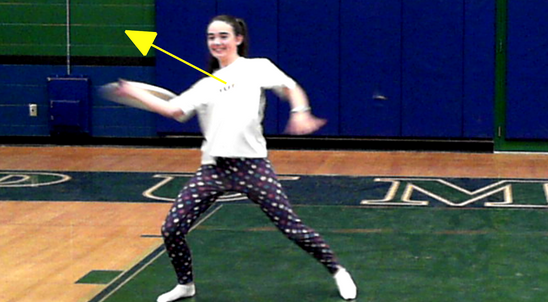
- Forearm is up and parallel or near-parallel to shoulders
- Off-elbow begins driving backward prior to forward movement of the throwing arm
- Fluid transfer of movement from off-elbow through shoulders to throwing arm
The last component is often the most difficult to teach and, for some developing players, can require many reps with a focus on fluid movement of power through the shoulders.
One area that appears related to the off-elbow drive is the pivot foot and traveling. With a strong off-elbow drive and sufficient counterbalancing by the off-side of your body, there should be no strong impetus to slide your pivot foot. Travels on both long and short forehands appear frequently to be the result of doing too much work with your throwing arm and side of the body and too little with your weak-side.
Off-Elbow Snap
A second common piece of mechanics for top-level forehand throwers, and one that may separate the longest throwers from the merely very long throwers, also occurs on the off-side of the body. At the end of the off-elbow drive, the off-elbow snaps back to the body. Again, while I’m not sure on the exact biomechanics of this motion, my take is that what we’ve always thought of as a “wrist snap” is a full body snap that originates on the weak-side arm and ends with the wrist snap. Your off-elbow begins the kinesthetic chain of stopping your shoulder and throwing-arm’s forward motion and the more deliberate and precise that whole sequence is, the more the force of your motion is transferred into the disc and the more control you have over it.
At this point, I don’t think it’s clear if there are best practices around how the elbow should snap back. While I’d recommend pulling your elbow back so that your upper arm is in line with your body, the most important thing is that you should snap back to generate maximum power.
These two pieces, the off-elbow drive and the off-elbow snap, are what I believe Brandon Malecek is referring to in his article that describes the “shoulder jerk.” Many other coaches refer to this motion as the “whip crack.” While the power is actually generated by the shoulder and back muscles, for most throwers the cue to use the off-arm is much more accessible and easier to put into action.
I mentioned in part two of this series that I appreciated Malecek’s “car crash” analogy. To play with that analogy some, instead of a car accident, imagine instead that it’s a car simply slamming on its brakes. The off-elbow drive is stepping on the gas pedal to generate maximum forward velocity and the off-elbow snap is slamming on the brakes to stop that forward velocity as quickly as possible, transferring it all to the unrestrained passenger (the disc).
Both parts of the off-arm movement are very obvious in this video of Malecek, one of the best forehand throwers in the world, throwing flicks.
Chest Pointed Forward
One best practice that top throwers share but some developing throwers lack is positioning the chest so that it points level to the ground throughout the throwing motion. Some developing throwers point their chest upward through their throwing motion. While this best practice will be more clear from a sagittal plane view, it is clear enough from a front perspective that it needs to be mentioned.
Here’s chest forward:
Here’s chest up:
An upward pointed chest means that much of your shoulder and core energy is directed upward (not forward). This will either result in throws that angle too far up or will force your body to correct your throwing motion in other areas, reducing your power.
Keeping your chest directed level to the ground appears to be closely tied to having a strong off-elbow drive. An upward pointed chest may be due to overcompensating with additional throwing arm movement due to a lack of off-arm/shoulder engagement.
A helpful cue here is imagining there’s a headlight on the front of your chest and working to keep that headlight pointed out instead of up. Your shoulders should be directly above your hips during the moment of release. Keeping your shoulders above your hips will mean that your chest is pointed level. If the shoulder of the throwing arm is further back, it will point the thrower’s chest upward.
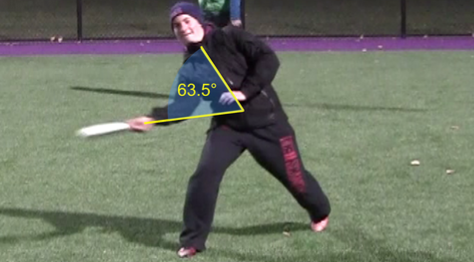
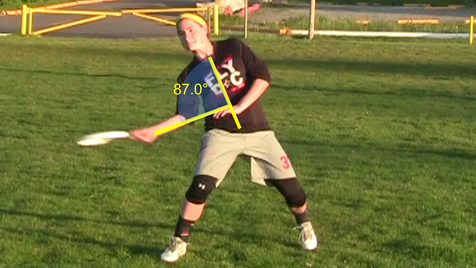
Forearm-Core Angle
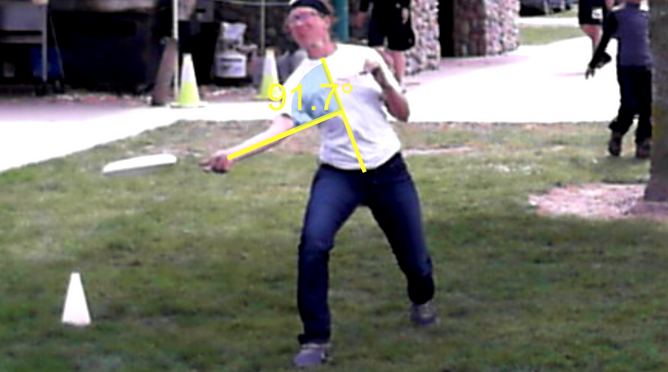
Beyond the off-elbow drive, the technique most strongly correlated with success is maintaining a forearm-core angle of close to 90 degrees at the moment of release. To identify the forearm-core angle, draw a line from the middle of the thrower’s neck through the belly button and another from the middle of the wrist through and past the elbow.

On reflection, this concept makes a great deal of sense. Imagine your forehand as a catapult turned on its side: your core is the base of the catapult, and your arm is the…arm of the catapult. Now, a catapult whose arm is at an angle other than directly perpendicular to the base is going to face two big issues. First, it will not be able to generate maximum power because the arm isn’t fully extended as possible from the base (given its length). Second, and perhaps more critically, if the non-perpendicular catapult releases either too early or too late, multiple axis of the the missile’s trajectory will be negatively affected. With the perpendicularly armed catapult, while a release too early or too late will impact power, the missile will still fly toward the intended target.
All of the same holds true for throwing a disc. Finding that 90 degree forearm-core angle will maximize your power and your consistency. One common related cue is that the “wrist should be below the elbow” on release. This is a good rule of thumb as, for the large majority of throws, your core will be slightly tilted toward your throwing side.
This is also very much related to your grip. Having a grip that allows the disc to sit at a 180 degree angle to your forearm allows the forearm-core angle to function at 90 degrees. The “power grip” where the disc sits more on top of the fingers forces throwers to a forearm-core angle at far under 90 degrees.
This year, UW Element’s Lauren Sadler (Scandal, Riot) did some work with her throwing form and saw huge improvements with her distance and consistency. Below is video of her throwing a forehand huck last October at the Club Championships and then in March at NW Challenge as well as still images of her releases taken around those times. It is clear how much closer to 90 degrees her forehand became over the college season, and it had a real, meaningful impact on her forehand consistency and power.
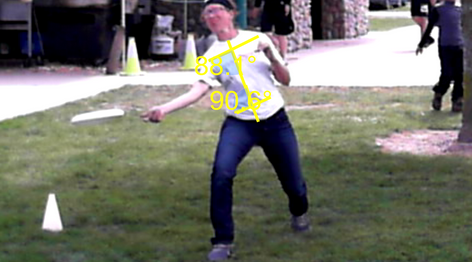
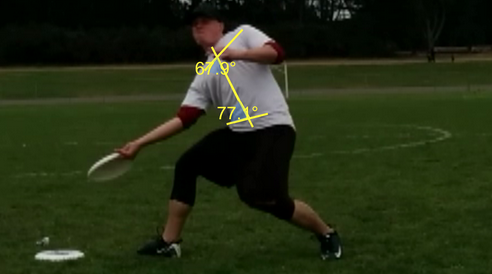
Shoulder-Hips-Core Alignment
Related to the forearm-core angle is the shoulders-hips-core alignment. This is another best practice that the most skilled throwers I’ve recorded consistently exhibit and developing throwers, even at intermediate levels, usually do not.
For top throwers, the line between their shoulders at the moment of release is parallel (or close to it) with the line between the hips. Those two lines are perpendicular to the line that runs through the core. What this means is that the hips and shoulders are both parallel to the forearm.
This best practice makes intuitive sense. The hips and shoulders are able to provide a significant amount of power through their rotation. But, if that power is not moving through the same axis as the forearm (and disc), the power won’t be channeled through the same vector as the disc and will be lost. Not only could it be lost, it could create inconsistencies or force other inefficient movement to compensate for the lack of alignment.
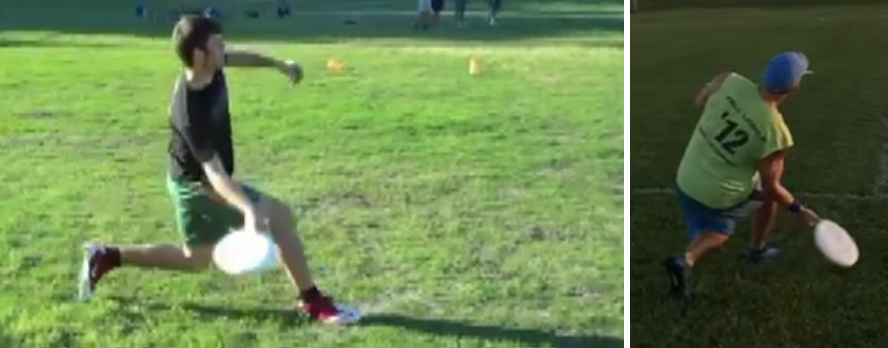
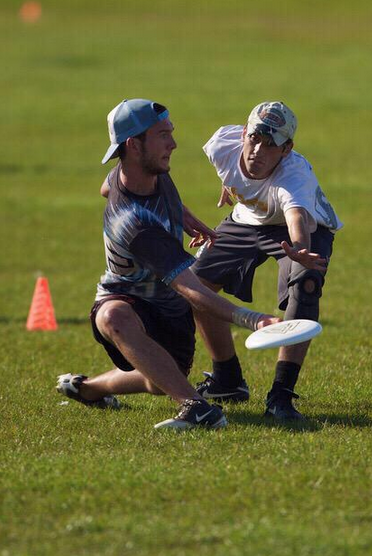
Below is an image of two throwers with close to best practice shoulders-hips-core alignment next to one much further from that 90 degree alignment. Notice that the thrower with the misaligned shoulders still has the 90 degree forearm-core angle. This is a good example of compensating in one area of the throwing motion for an inefficiency in another area.

Areas Without Clear Best Practices
The previous techniques are the ones that have clearly emerged from the beginnings of the work to identify best practices. There are other areas that are often discussed that I want to address. For these areas, I don’t think there is yet a clear best practice—either because we don’t have enough data or because multiple techniques may be sufficient. While I don’t think there are clear answers to these questions, I do want to share my perspective.
Non-Pivot Foot Angle
Players frequently ask what angle the non-pivot foot should be. Some top-level throwers pivot and place their non-pivot foot at a perpendicular angle to the target while others point the foot straight downfield; most throwers fall between one of these two extremes. One reason I think best practices will be difficult in this area is that you need to be able to pivot at many different angles to be a successful and versatile thrower. In addition, from what I’ve seen, throwers can get good distance with many non-pivot foot angles without an apparent loss of consistency (unlike the other best practices previously listed). Many throwers can get good distance without a pivot at all.
Here’s Ring of Fire’s Justin Allen with a no-pivot huck:
Here’s the DC Current’s Markham Shofner with a perpendicular pivot:
That said, if you are going for distance and have no other restrictions on your throw (like a mark), I believe there is some indication that the foot should be pointed more downfield than perpendicular to the target. Both Malecek and Brodie Smith throw with this style of pivot when demonstrating forehand hucks.
I believe this makes intuitive sense as well. When you’re pivoting into a throw, you are executing a lunge. And to have good form on your lunge you need your knee to track over your toes. If you are trying to throw for power, you want to harness the strength of your hip rotation. Maximal rotation will involve your non-pivot hip moving downfield, which will push your knee in that direction as well. So, your foot should be aligned with the direction that your knee and hip are moving to generate power—which certainly shouldn’t be 90 degrees out to the side (or even worse, pointed backwards). Beyond the potential loss of power, the stress that this position can put on your hip, knee, and ankles could create a long-term injury risk.
I mentioned the need to have various pivoting angles in game scenarios. On this note, I believe more offenses are moving toward systems that allow more balanced, upright throwing and throwing with the non-pivot foot in the air (to allow for faster throw-and-go movement). The forehand throw-and-go is a worthwhile move to practice, but I believe that the priority for developing throwers is cultivating the in-depth understanding of throwing for power. This understanding will provide you a better base with which to learn sound throw-and-go moves.
Draw Angle
There is also some discussion about what is best practice on the forehand draw. Most top US throwers utilize a vertical draw, drawing the disc back perpendicularly to the ground or near perpendicular. Some other top throwers, particularly in Japan, utilize a flat draw, drawing the disc back parallel to the ground. I don’t think there is a clear best practice here and, for most players, I don’t recommend putting much focus on this area.
Here’s a flat draw:
Here’s a vertical draw:
From my perspective, I think each style has its advantages. The flat draw may increase consistency and accuracy at the margins and can allow for a quicker release while the vertical draw may mask the release point (making it more difficult for markers to get blocks or otherwise disrupt the throw) and facilitate a better wrist roll (the loading of the disc for the wrist snap).
That said, there are some draws that are outside the range of best practice draws. During the draw, the disc should never be considerably past 90 degrees (with the top of the disc facing down), as seen below. At this point, throwers lose the benefit of the more ergonomic wrist roll and the work they must do to level the disc out can have a negative impact on consistency.
Follow-Through
I want to address the follow-through since I believe it may be an important part of the forehand technique to analyze and I haven’t spent much time on it yet. Some throwers that I’ve observed have a long follow-through while others have a shorter one that stops soon after the throw is released. At this point, I don’t have a recommendation for which is preferred.
There are, however, many indications that follow-throughs in the same plane as releases will lead to greater throwing consistency than follow-throughs that move up or down.
Wrist-Roll and Wrist Snap
One of the limitations of the video analysis approach to the forehand is that it is very difficult to see smaller mechanics that may be playing a significant role on forehand power and consistency. I expect a top-down and side view of throwing with a very high quality camera may lead to identification of some best practices of the “wrist-roll.”
I do believe that what we’ve always thought of as a “wrist-snap” (the forward motion of the wrist upon release) is actually a larger full-body snap started by the off-elbow snap and putting greater focus on that full-body snap may improve the snap of the release. From experience, one obvious cue for very new forehand throwers is to keep the palm faced up during the wrist snap. Pronating (turning over) your wrist on release is a common issue and results in the disc curving outside-in and down.
The Unknown Unknowns
I am sure there are other aspects of the forehand that this article does not address. Almost all of the video that I’ve taken has been shot from the front (coronal plane), and I believe that we can learn even more through video of the back (reverse coronal plane), the side (sagittal plane), and the top-down (transverse plane). There are surely aspects of the forehand technique that I haven’t attended to or considered at all.
We are in a tremendous period of advancing our understanding of the sport and the skills that we use. I hope that this series has not only helped share some new insights on one of those commonly used skills but also challenged others to uncover more best practices in the forehand and beyond.
Series Summary
When Teaching/Creating Resources
- Understand the best practices that your body knows by watching yourself.
- Make sure that your words and posed images match what is actually being executed.
- Use video wherever possible to complement your words.
- Use frames from video of key positions wherever possible because they are typically better than poses of key positions.
Learning and Practicing
- Throw frequently at the edge of your comfort zone.
- Work on your long, flat forehand.
- Throw with better throwers.
- Practice with non-judgmental awareness: Concentrate on areas that you want to improve. Focus more on the feeling of a good throw (power, control, stability) than on the specific physical cues.
- Watch video of yourself throwing and, if possible, overlay it with throwers with better form.
Clear Best Practices
- The off-elbow drive engages the shoulders and generates power.
- The off-elbow snap begins the power transfer to the disc.
- The chest should be pointed level to the ground.
- The forearm-core angle should be close to 90 degrees to maximize power and consistency.
- The hips and shoulders should be parallel and perpendicular to the core.
Other Recommendations
- The draw should be between flat and vertical; within this range, this should not be a big area of focus.
- The non-pivot foot angle should facilitate hip rotation and safe movement but is unlikely to have a significant impact on power.
- Follow through in the same plane as your release.