Brummie dives into give-go movement, clips, and drills using his new coaching tool, Flik.
June 2, 2015 by Sion "Brummie" Scone in Analysis with 9 comments
Most competitive-level ultimate players are familiar with the give-and-go to the open side. But what about a give-go to the break side? Check out this move from Bart Watson in the USAU 2014 Final:
From 30 meters out, with one low flat pass thrown before a marker is in position and two short-range, uncontested backhand flips, Bravo scores easily. The break side give and go is something more teams should practice. And you don’t have to be Bart Watson (or tool on your mark) in order to use it effectively; rather, it’s something that you can probably practice with just the right drills and a few small adjustments.
Bravo Consistently Use Both Types of Give and Go Moves
If you watch the 2014 USAU Club Championship finals between Bravo and Ironside, you’ll see a lot of lateral give and go moves run with the dump. Bravo loves a give and go, particularly if it keeps the disc in the hands of Watson, Mickle, Matzuka or Ryan Farrell. By timing a cut to the break side at the same moment that an open side give and go move is happening, it gives the thrower two options, with the marker unable to spoil the open side throw for the risk of being broken. It puts the defense in a position where they must give up one of the two.
In the clip below, Ironside is forcing backhand and Farrell attempts a give and go move with Mickle to the open side (towards us). Mickle’s marker shifts his weight a bit across as Farrell hits the center of the field in an attempt to pressure the open side give-go pass; Gibson spots this and cuts break side to abuse the over-committed mark. In the end, it’s not even a breakside throw because the marker is so out of position.
How Do I Practice It?
Watching a clip and move like Watson’s original break to give-go attack can be intimidating, but, even if you’re not as naturally talented as Bart, you can actually learn a lot from breaking the move down into it’s component parts and creating the right drill from it. A quick preview of where we’re going:
Adding the break side give and go to your offence is just one trick that could help your handlers to keep their defender honest, and maybe give you an easy score every once in a while. First, let’s break down the movement into its constituent steps using graphics from Flik, my new coaching project:
- Breaking the mark
- Gaining separation
- The return pass
- Continuation
Set Up
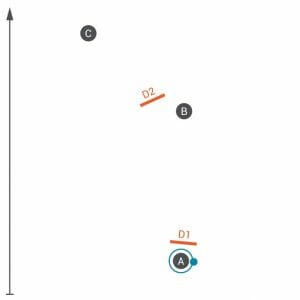
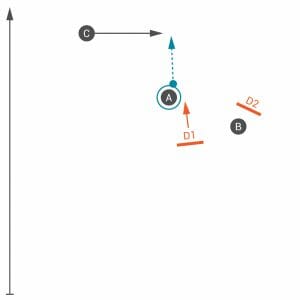
Begin with a thrower, (A), and marker, (D1), downfield cutter (B) guarded by (D2), and a continuation cutter (C), arranged as shown in Fig. 0. Exact spacings are not important, so long as (B) has space on the break side and (C) cuts from the open side to break for the final continuation pass.
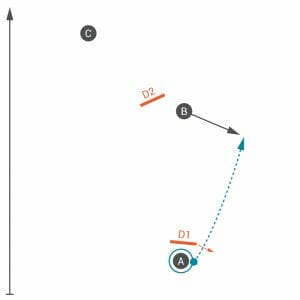
Breaking the Mark
Begin with a marker who is out of position. For increased realism, begin the drill by having (A) catch the disc heading to the break side. If your focus is to practice the return move, then your marker should allow their mark to be broken; this gives everyone plenty of reps. As your team progresses, increase the intensity and difficulty of the mark. Remember; this is a drill that abuses an overcommitted mark, so if people start laying out then the solution is to fake first, throw second, and burn them while they’re on the floor.
Deep Dive on Setting Up the Mark and Getting the Breaks
Even in the Watson clip, the throw isn’t hugely important — or at least not as important as it seems — really, it’s the pivot. Bart steps far across onto the break side and gets the marker to over-commit.1
The key to the break side give and go is getting the mark to over-commit. They aren’t going to unless they have seen you catch the disc and throw immediately to the break side; something Bart does a lot:
Notice how Bart isn’t necessarily attacking the mark or using incredible throws to get the disc out; he pivots directly backwards towards his own end zone, finding a space that the marker is not able to stop. Many players train to square up to the mark, but here Bart knows that throwing the disc directly towards the sideline will be impossible for the marker to prevent. Low risk, high reward.
It’s also worth recognizing the role that the marker plays in this. If a marker is committed to preventing a low, wide release then they put themselves in a position where they are incapable of reacting quickly to a thrower who is ready to head in the opposite direction (see the first Watson clip, where John Stubbs commits to stopping a wide break and is out of position on the give-go.) Notice after each initial throw in these clips, the first step of the thrower is directly away from the direction of the throw; if the thrower is able to gain separation immediately, the break side give and go is on.
Any smart defense is going to identify the moves that hurt them the most and make adjustments to stop them. An adaptable offense is capable of abusing such an adjustment, and using either wide break throws (like the one above) or breakside give-gos (like the other clips) depending on what the defense gives them. And you don’t need to be a world-class thrower like Watson or Mickle to add the break side give and go to your arsenal; all it takes is a little practice and commitment to working the right pivots.
Gaining separation
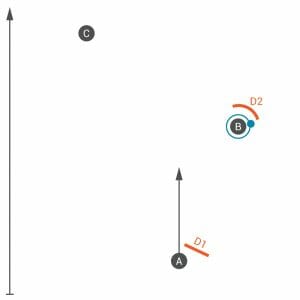
The next key thing to practice is shifting your weight onto the non-pivot foot as soon as you release the disc. Wait, non-pivot foot, what? Yes. If you’re throwing a righty forehand, put your weight onto your right foot, then lean back towards the left. It’s easier to push back up into a running movement from here. Watch those clips again and you’ll see the thrower pushing off their non-pivot foot as the primary accelerator. Now run hard, before the marker can adjust. This move will only work if the marker is slow to react or has over-committed, so when first introducing this movement, get your marker to give the thrower a step.
The return pass
(B) should be conditioned to look for continuation down the break side channel before attempting the return pass; look at Farrell in the above clip. He receives the disc from Watson, then checks immediately down the break side. This shifts his marker and makes sure that the return pass to Watson is uncontested.
This move is the same as a conventional handler “dish” move. Note how Farrell just drops the disc into Bart’s gut, rather than trying to lead him; Bart’s momentum does all the work here.
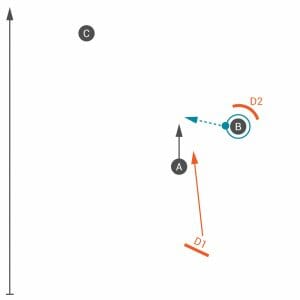
Continuation
As ever with continuation, the aim is to get this throw off before the defender recovers. Watson doesn’t really need to pivot in this particular example, but by stepping directly forward he’s increasing the distance from his marker to the disc, making it harder for his defender to recover. It’s a small detail but makes a big difference.
***
Flik has a library of detailed drills for ultimate, practice plans and theory to learn more about ultimate.
As a bonus, here’s another great example of this move featuring Adrian Yearwood & Jeff Linquist of Team Canada.
Here are two other examples of this showing Buzz vs Ironside: 1, 2; in both examples, as the cutter catches the disc, watch how the marker steps in front of where they expect the receiver to want to throw… and see how the same receiver pivots in the exact opposite direction to take advantage of a new throwing lane. ↩
