It's more than just intuition. What individuals and team leaders can do to foster a greater understanding of how to see and use space on the field.
April 26, 2016 by Kayla Emrick in Opinion with 1 comments
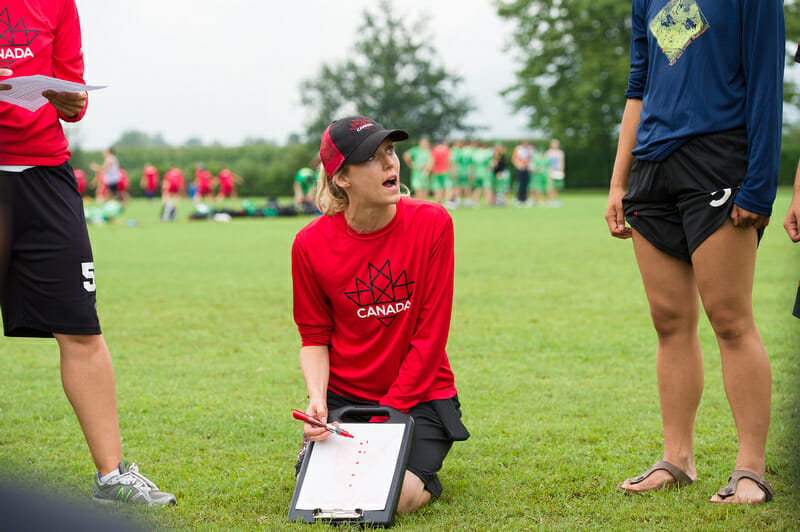
Field vision is perhaps the most intangible skill in ultimate. It’s vitally important to the success of a team or an individual player, but we oftentimes chalk it up to an innate ability, an unlearnable attribute, or something that simply comes with time. As you are learning the game, it can certainly be difficult to feel like you know where you should be going or how to keep the field organized. Fortunately, you can take steps to consciously improve your field vision.
First things first, what is field vision? While athletes across any number of sports are often commended for “seeing the field well,” there does not seem to be a standard way to describe what this actually means. My simplistic definition is this: field vision is an understanding of how to conceptualize and exploit space, positioning, angles, and timing on the field.
It goes beyond rattling off where players set up in a horizontal stack or describing the fundamentals of a good mark; it’s understanding the best timing and angles for cutting out of a horizontal stack based on where a teammate received the last pass, or how to rotate your mark based on where the thrower is on the field. On offense, field vision means effectively creating space. On defense, it’s all about limiting the space available for your opponent to attack. On top of this, good field vision requires the ability to visualize continual play and adjust in real time to a fast-paced game of ultimate.
Still sounding a little intangible? Here are some tips for how individual players can focus in on a things that help build field vision and how team leaders can support players’ field vision learning in a variety of ways.
Individuals
1. Create throwing windows.
Players that get thrown to are almost always in motion, so effective throws put the disc to a space that a player can run onto. Think of this space as a throwing window, an area that a player can throw to so that their receiver can keep running at their current pace to catch the disc without their defender catching up. The bigger the window, the easier it will be for your teammate to hit it. Every time you cut, ask yourself: what space can my teammate throw to? What can I do to create a larger throwing window?
Evaluate the position and motion of the other players on the field. Is there a bigger space to cut into if you delay your cut by half a second while another teammate — and their defender — is clearing a lane? Can you increase the size of the throwing window by adjusting the angle of your cut based on where the mark sets up? Throwing windows are why everyone rails against horizontal cuts (in most circumstances). Cutting horizontally frequently means your available throwing window is moving very quickly and constantly shrinking, making it a tough throw to limited space. Make sharp, vertical cuts towards your thrower’s open side to give your thrower the largest possible throwing window
2. Create space for others.
Find that you’re constantly cutting people off on accident? Before you make a cut into what seems like extremely open space, take a quick look around: are there cutters deeper than you that are cutting under? Is a handler setting up a strike cut into that space? Notice who’s already moving and avoid using space that someone is already attacking.
This gets easier as you learn your team’s offense. Has your team decided where they want cuts to attack from, whether out of the back of a vertical stack or from the inside lanes in a horizontal stack? Maybe your team’s goal is to attack the breakside and wants to leave a lane to throw to a person at the front of the stack. Knowing where the next cuts should ideally be coming from will inform the places you should check before you make your cut.
Finally, when you do make a cut and don’t get the disc, remember that it’s not the end of the world. Sometimes intense defensive pressure keeps you from getting open; other times the thrower might just not see you or not be able to get a throw off. With seven players on the field, you don’t have to be open all the time. After cutting, clear the space for another player to use.
3. Make loud mistakes.
Maybe instead of cutting people off all the time, you feel a little paralyzed on offense, totally unsure of where to go. Hiding in the stack is a way to avoid making mistakes, but it puts additional pressure on your teammates and will never allow you to learn.
Instead of shying away from making mistakes, accept that the learning process inevitably involves messing up. Go somewhere, try something, follow your instincts, and see what happens. Just be conscious of what exactly you’re doing so you can evaluate it later. “Quiet” mistakes, like hiding in the stack and not cutting at the appropriate time, frequently go unnoticed, and the only criticism available is that you need to move. “Loud” mistakes, like cutting a teammate off or making a horizontal cut, give your leaders something specific and actionable to critique.
You might not know exactly what you’re supposed to do in every situation, and that’s okay! If you try something, your captains, coaches, and teammates can highlight what you did well and also talk you through a better way to do things next time. The very worst case scenario is you’ve created a learning opportunity for everyone involved — just make sure you learn from it! If you don’t do anything for fear of messing up, there’s nothing to critique and nothing to be learned. Be ready to embrace constructive criticism, and make loud mistakes!
4. Change the way you watch ultimate.
It’s so tempting to watch ultimate as a spectator, following the disc as it transfers hands to make sure you catch all the action. Unfortunately, the most exciting way to watch ultimate isn’t necessarily the best way to learn. Instead of following the action, focus on one player at a time. Follow their path around the field, and watch what they do when they’re NOT involved in the play. How do they clear out when they’re not open? How do they time cuts off of others? What angles do they take, and which ones are effective?
Whether watching video or observing from the sideline for your own team, focus in on one person’s movement; look for how it fits in with the team strategy.
Team Leaders
Field vision isn’t something that can be taught on its own, but should instead be infused into every structure you introduce to your team. Be aware of the influence that spacing, positioning, angles, and timing have on every concept or drill your team uses. These things become second nature to more experienced players, so it’s especially important to think through and articulate what might not be readily apparent to newer players.
Use a variety of methods when explaining concepts to help your team understand the space on the field. Keep in mind that different methods work better for different players.
Infuse field vision into coaching tools in the following ways:
1. Verbal explanations
Focus on effectively articulating the why of a particular concept or drill. Verbally explain what you’re trying to accomplish both within the drill and how the learned skill fits into your larger team structure or strategy. Some players might not succeed at a drill at all if they don’t know why you’re doing it or understand the context. But if they can latch onto the underlying goal of a drill, they can perform well without much more guidance.
Take, for example, a simple huck drill and a handler cut drill. Go beyond just explaining how to go through the motions. Make sure players understand what the drill is trying to accomplish and how to do it effectively.
For a huck drill, it’s not enough to say, “Player X cut deep and Player Y throw to the deep cut.”
Instead, introduce a huck drill by saying: “Cutters, set up in position with a large lane for the thrower to throw into, then make a straight, vertical deep cut; avoid cutting at a sharp diagonal angle until the throw goes up. Diagonal deep cuts shrink the throwing window with every stride and provide very little room for error and less space for your hucker to put the disc to. Open the throwing window by cutting straight deep. Huckers, throw the disc to the open side window out in front of your receiver to give them room to run on to the disc without their defense closing in.”
And for a handler cut drill, saying “Fake upline, cut back for a dump, and receive the disc” doesn’t convey the actual goal of a handler swing off the line.
Instead, get to the heart of why this movement is important: “Getting stuck on the sideline gives our offense very little space to get open in; swinging the disc off the line toward the break side allows our downfield cutters to attack a different open space. Handlers are responsible for cutting for this swing throw and moving the disc laterally to open that space. A handler sets up slightly upfield of the thrower, fakes a strike cut upline to get their defender out of position, and then cuts back at an angle towards the middle of the field. This way, the handler receives the disc with momentum to continue towards the break side and without losing too many yards. With the disc off the sideline, our offense has much more room to get open.”
It doesn’t take much time to give a quick overview of the why behind a drill. Sure, this type of information might not resonate with all players, but for some it might give the “aha” moment they need to understand the field a little better.
2. Visual diagrams
There are tons of visual learners out there, so make a point of drawing or diagramming the concept you’re discussing. Use a whiteboard at practice, send out Powerpoints in advance of practice, do whatever you can do to show the bird’s eye view of the field. This can give players a reliable mental image of where space exists in any given setup and how they want to use that space, something to fall back on while playing.
Draw out the actual paths players take when cutting, being intentional and accurate — a lazily drawn cutting pattern can convey the wrong idea or won’t allow people to visualize how it is maximizing the space. Think through your diagrams and pay attention to angles, distances, and spacing.
Think back to the huck drill and handler swing drill. Drawing out these movement patterns is the perfect opportunity to demonstrate exactly what path players should take, and can even help demonstrate where the open space on the field is. You can even demonstrate the difference between an open throwing window created by a vertical cut in a big lane and the small, hard-to-hit throwing window that results from flat cuts in small spaces.

A diagonal deep cut doesn’t open a throwing window for the hucker.
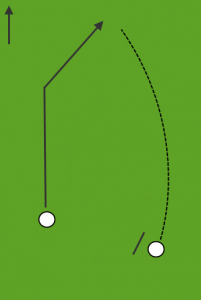
A vertical cut in a big cutting lane gives the hucker lots of space to throw to and the cutter lots of space to track the disc down, giving a larger margin of error to both.
Diagramming a proper handler cut for swinging the disc off the sideline can really help illustrate the angles you want handlers to take and the space where they should be receiving the disc. Again, it’s a great opportunity to contrast an ineffective handler cut that fails to get the disc to the middle of the field and one that effectively creates break-side momentum.

An ineffective cut doesn’t put the defense out of position, loses yards, and gives no momentum towards the break side.

A successful cut fakes upline to throw off the defense, stays close to level with the thrower, and gains momentum towards the break side so that the disc can now attack the open break space.
3. Physical demonstrations
Before jumping into a drill, demonstrate exactly what the correct pattern of movement looks like. For a lot of people, things don’t click until they see someone else do it successfully. If detailed descriptions of the drill’s goal or visually laying out the field on paper don’t add to someone’s understanding, give them something physical to replicate.
Have experienced players demonstrate a drill and point out key things that they do to make it work. Show a vertical deep cut with an open throwing window and a nice leading huck; demonstrate the best angle for a handler swing, collect the pass, and follow through with a fake toward an imaginary swing cut or breakside cutter. Seeing is believing.
4. Guide cones.
When all else fails, put up artificial barriers in your drills. Sometimes concepts, visuals, or demonstrations still won’t get the point across for all players, aren’t enough to overcome existing bad habits, or are simply too high level for inexperienced players to connect with.
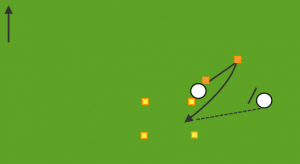
Help your newest players succeed by using guide cones in drills to indicate exactly where they’re supposed to go. This can help build intuition in newer players; if they get used to changing direction at a certain angle or receiving the disc at a certain distance, they’ll build good habits that subconsciously translate to game play. Going through the correct motions, even without a deep understanding of why those motions are correct, can build muscle memory and lay a foundation for better field vision.
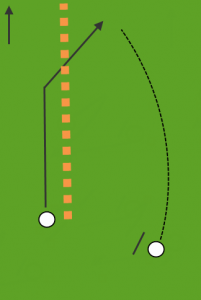
Struggling to keep cutters in a huck drill from cutting off their throwing window? Put a vertical line of cones on the field and contain the deep cutter to a lane. The cutter can’t cross the line of cones until the huck is in the air.
Handlers having trouble nailing the correct angle of a swing cut? Help them out with guide cones: a cone where they start, a cone where they fake to, and a box of cones where they should aim to receive the disc.
Guide cones work best when they disappear over the course of the season — as these drills start to feel comfortable, take cones away in stages and see if good habits stick. Every once in a while, ask or remind players why it’s a good idea to receive the disc in specific places, and see if things start to click.
—
While it’s true that field vision can be learned and taught, keep in mind that it isn’t a prescriptive set of rules that can be memorized and followed to a tee. At its heart, field vision is about understanding the space on the field and the guidelines that go along with why and how your team is trying to use so you can apply the appropriate skills in any given situation. It culminates in an athletic intelligence that players use to anticipate situations before they arise, allowing for fluid, proactive movement.
Think of it like the difference between vocabulary and reading comprehension: memorizing a lot of words doesn’t mean you’ll know how to understand them in context. You can memorize the cutting pattern your team uses, but you also need to learn what makes them effective and how to adjust in the flow of a game. Team leaders, keep in mind that you’re trying to build good habits and flexible movement, not rigid adherence to a strict set of rules. Put the guidelines in place and allow your players to succeed by reading what’s happening on the field and exploiting the available space and angles.