Throwing on the correct flight path needs to happen not just on the highlight-reel hucks and break throws, but on EVERY throw.
August 16, 2016 by Dave Lipson in Opinion with 2 comments
This article is presented by Spin Ultimate; all opinions are those of the author. Please support the brands that make Ultiworld possible and shop at Spin Ultimate!
Throwing effectively at a high level isn’t about throwing 70-yard hucks or body-contorting breaks.
Against talented, aggressive defenses, offenses need to seize every opportunity to create space and gain yardage, and need to keep the disc out of the reach of fast, bidding defenders. Those things need to happen not just on the highlight-reel throws, but on EVERY throw.
As soon as you catch the disc, you now have the most important job in the offense — throwing the next completion. That means not only making the correct decision about which receiver to throw to, but also delivering a throw that meets the following criteria:
- Is as easy as possible to catch.
- Lets the receiver catch the disc in a favorable or advantageous position.
- Minimizes any defender’s opportunity to get a block.
Controlling the shape of your throws is one of the most important ways to do all three, and can mean the difference between a routinely maintaining possession and a costly turnover.
Throwing Underneath
Top-level throwers use the shape of their throw to gain an advantage on every play, even ones as routine as throwing to open-side in-cuts.
1. The Un-Biddable Throw
A little bit of shape on a straight-ahead throw can take a defender completely out of the play, even if the defender is in your cutter’s shorts.
As a thrower, be cognizant of the defender’s positioning relative to your cutter. After your receiver has committed to an open-side under-cut, most of the time the defender will be shaded over one shoulder or the other. If you can control the shape of your throw, you can use this positioning against the defender, and deny him or her a clean bid at the disc, accomplishing criteria #3 above.
On the (righty) forehand side, if the defender is over the cutter’s inside or breakside shoulder, an outside-in flight path brings the disc in to your cutter’s left shoulder. Conversely, if the defender is charging on the receiver’s outside shoulder, an inside-out shape aimed to your cutter’s right side may be the better option. Putting the disc on the exact opposite side of the cutter’s body from the defender makes it as hard as possible to bid on the throw, since the bid would have to go around or through the cutter.
You just sealed out the defender, and you weren’t even the cutter.
2. Be A Field General
Controlling the shape of your throw also helps you manage where your receiver makes the catch, and therefore where the next throw will be coming from, accomplishing criteria #2 of a good throw. Managing this aspect of the play intelligently can help keep the disc in the high-value parts of the field as the possession develops.
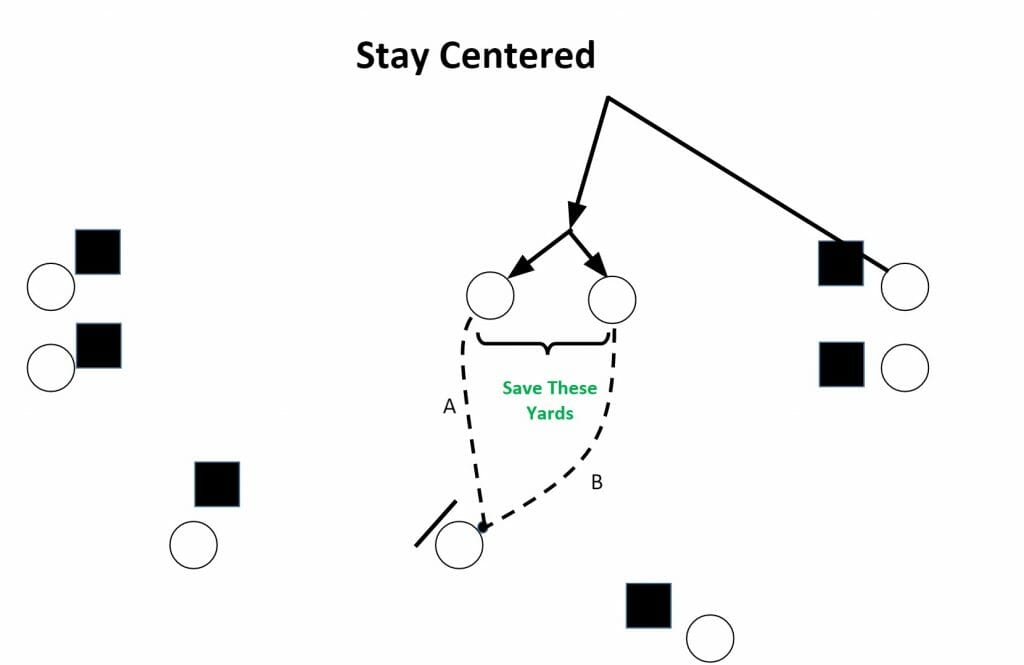
For example, in a spread offense where the most advantageous place to attack from is in the center third of the field, under cuts to the open side can put throwers between something of a rock and a hard place. You’re gaining some yardage, but not a lot, and you’re inevitably eating up space on the open side, which makes your break-side cutters less accessible, brings potential poach defenders into the play on the open side, and limits your re-set options. However, if you can deliver the disc to the under-cutter with a gentle inside-out (throw A in the figure below), you can lead a receiver to the middle of the field, preserving the lateral space you would lose with a lazier or less-confident outside-in throw that leads the cutter closer to the sideline (throw B in the figure below).
Similarly, in games played with heavy crosswinds, keeping the disc on the upwind side of the field is especially valuable to keep options open on continuation throws. Shape your pass in a way that allows your receiver to gain or maintain yardage in the upwind direction whenever possible.
No matter what shape set you play out of or what the game situation, a little extra control from throwers means the offense can march down the field on in-cut after in-cut, keep the disc in a place where all its cutters can be dangerous, and stay away from higher-pressure sideline resets. Against good defenses, good offenses need to take this opportunity whenever they can.
Practice Tip: Target Throwing, from the Zen Throwing Routine
Throwing with a partner, have your partner put up a one-hand target to the outside of their body. Try to hit that target without them needing to move their arm to catch. If you can’t hit the target perfectly, try to make your misses be farther away from the hand on a line from your partner’s heart. During the course of the session, have the target hand move around to different places around their body to get practice hitting each. This exercise simulates throwing to a smaller target to increase accuracy, helping you be ready to throw to the non-guarded side of a player during a cut.
Throwing Deep
1. Take the edge off
If you’re throwing to a deep cut that was set up well — pointed straight down the field, parallel to the sidelines, and with plenty of lateral space from the disc — you want your deep throw to be as straight and flat as possible. Putting the throw out in front of the receiver and letting it hang (“putting it on a shelf”) lets the receiver choose when and where they want to attack it, nailing criteria #1 and #2 on our list. If you’ve made a good choice about whether or not to pull the trigger (your receiver has separation from the defender and a head start in the race to the end zone), putting a straight, flat throw out to space also gives your receiver the best opportunity to take a path to the disc that seals out the defender — fulfilling criteria #3.
Danny Karlinsky Flick To Matt Rehder
Conversely, a throw traveling on a steeper vertical angle and with more curvature in its shape forces the receiver to work a lot harder. There are fewer points in the flight path where they can attempt the catch — they have to get to the exact right spot, at the exact right time, leaving little margin for error.
2. Good deep throws just die, they never fade away.
Few things are more infuriating to watch than a deep throw that looks good coming out of the thrower’s hand, looks good through the air, looks like it’s going to land right at a spot the receiver can get to… and then fades away from the cutter, landing just a few yards outside of his or her reach.
Deep throws tend to fade left or right when throwers push the top end of their range. Trying to put a little extra juice on a throw leads to losing control of your mechanics (in your grip, your throwing motion, or your upper body rotation) and missing the sweet spot — that combination of release angle, arm speed, and disc spin that keeps a throw straight and flat.
Even if the throw is completed, a throw that fades violates rule #1 on our list. That’s exactly what you see in this clip:
Even though the throw gets from point A to point B and is completed for a goal, the receiver has to really get on his horse, and needs some fancy footwork to keep the catch in-bounds. Over the course of a game and a tournament, increasing the difficulty of plays like this can add up, and lead to one too many turnovers.
Practice Tip: Throw on a football field.
In one-on-one deep throwing practice, throw from the same yard line, and note where your partner is catching your throws. Keep track of the distances that you can consistently reach with a straight, flat throw that doesn’t fade. Also keep track of how far is too far for you to consistently control the flight path of the disc even if you are completing throws. When you leave that session, you’ll have your range dialed in. Come game time, if a deep look is longer than you know you can hit, then look it off, throw a fake, and hit a better option.
Resetting The Disc
Resetting the disc is another situation where the shape on a throw can make all the difference — the spaces are tight, cuts develop quickly, and defenders are locked in. Putting the right shape on your throw can help ensure that you not only complete the reset, but also set up your next opportunity to attack.
1. Resetting to the middle
Against a sideline force, a well-executed reset cut points towards the middle third of the field (so that the offense can move the disc further from the sideline and the handler can create more separation from the defender, creating a larger window to attack the break side).
In order for this cut to be powerful, the reset throw needs to be placed in front of the cutter, so that he or she can run onto it, make an easy catch, and smoothly turn towards the break side for a continuation. This means the throw needs a gentle outside-in curve to get around a sideline-forcing mark and keep it as far away from the trailing defender as possible.
This throw also needs to lead the receiver so that she can turn the corner as she catches it. This means the disc needs to be thrown at low speed, but still be smooth and stable.
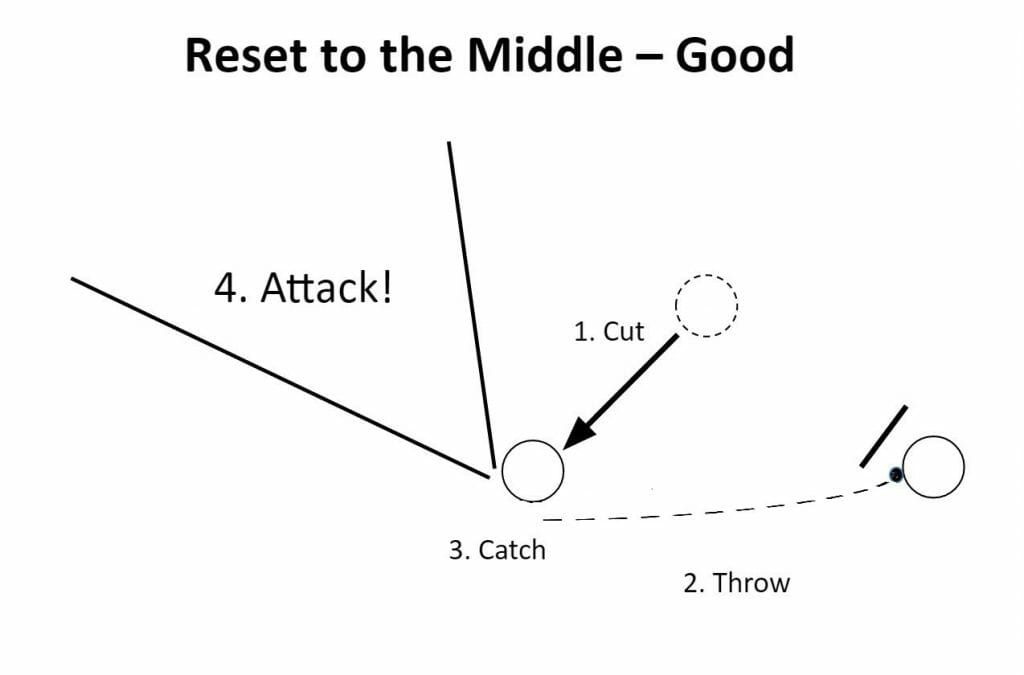
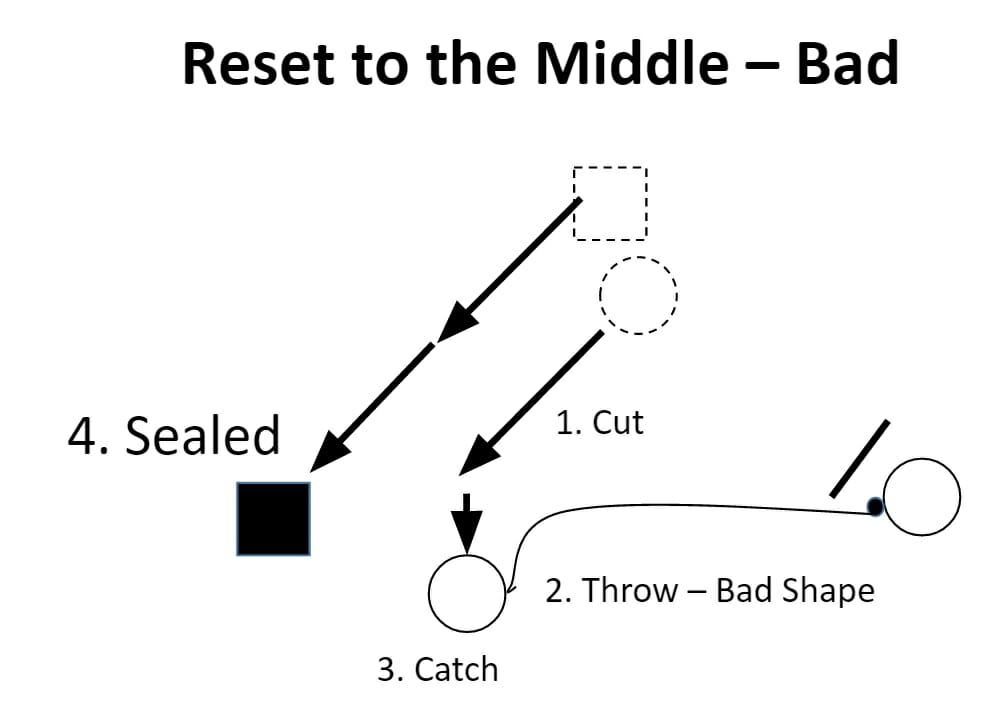
If the throw is short, or fades further into the backfield, it forces the handler to break the cut off, angling more towards the thrower and the force side. This takes the pressure off the handler defender, allowing him or her to seal the break side much more easily.
2. Resetting up the line
Completing a reset pass to a handler cutting up the line can be one of the hardest tasks that beginner to intermediate throwers have to complete on a regular basis.
When players are unsure that they can deliver a short throw with accuracy and/or touch, they resort to a couple of common crutches: A) waiting a beat too long and zipping a straight, flat throw that is both tougher to catch and closer to the defender (violating goals #1 and #3) or B) throwing early, but with a high/wide release that makes the throw less stable, and gives the cutter fewer options on where and how to catch it (violating goals #1 and #2)
Similar to the backfield reset, this throw is properly delivered with a gentle outside in curve and with some drag, so that the disc can be thrown early and sit out in front of the receiver. This lets him catch with his momentum continuing forward, and makes it easier to assess what’s happening downfield, both of which puts him in a better position to throw deep.
In both of these reset situations, throwing a pass with the right shape will not only help you complete the reset pass, but it will also help set up the next, more dangerous pass.
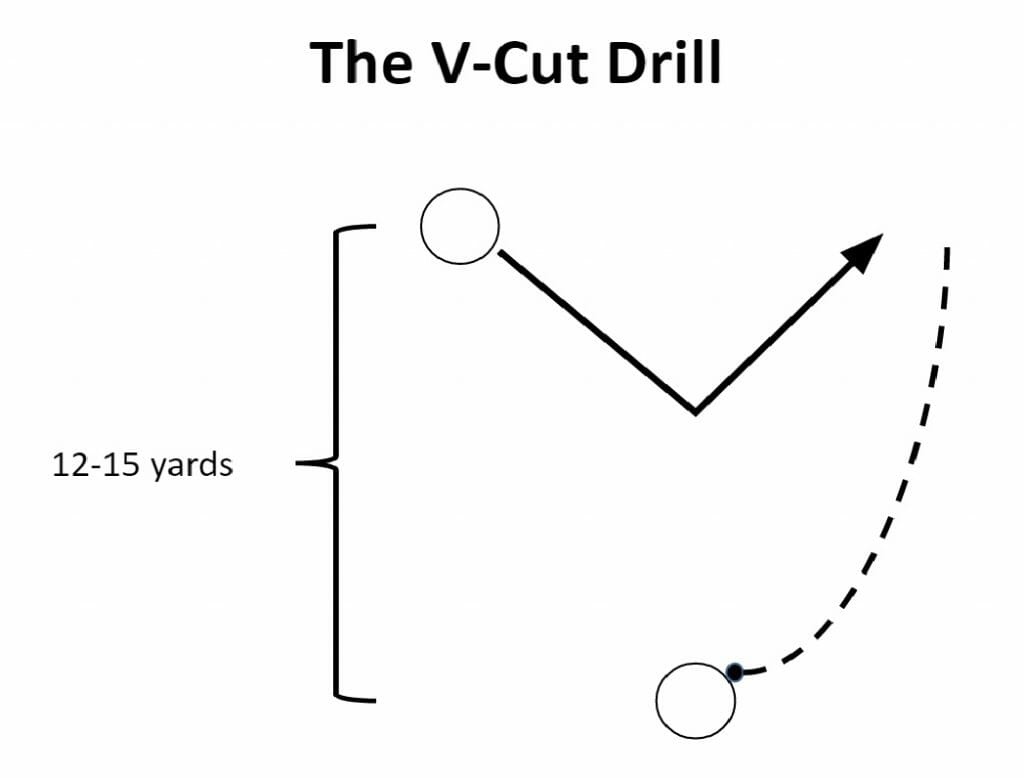
Practice Tip: The V-Cut Drill
Use a variation of a common warm-up/cutting drill to give yourself and your teammates a lot of reps throwing a short-distance away pass with touch. Working in pairs with one disc, one player is a static thrower, the other an active cutter. The cutter drives towards the disc then releases away at a 45-degree angle. The thrower should lead the cutter with a throw that has the same shape as the up-the-line reset throw (outside in, with some touch, sitting out in front of the cutter). After the catch, the cutter should set and deliver a crisp throw back to the thrower, then repeat the same cut on the other side.
Conclusion
Focused throwing to aim small, finding the range on the fade of your deep throws, or tweaking the flight path of your reset pass may not be the most glamorous thing to practice, but mastering the shape of your throws will allow you to play at a much higher level. Against smart, athletic opposition, having command over every aspect of your pass gives you the kind of precision that can take a defender out of a play, and gives an offense the power it needs to impose its will on opposing defenses.